参考:https://networkx.github.io/documentation/stable/tutorial.html#adding-attributes-to-graphs-nodes-and-edges
引入networkx以及绘图所需的matplotlib。
1
2
import networkx as nximport matplotlib.pyplot as plt
1.图、点与边
生成空图,不包含点 和边 。
向图G中添加点。可一次只添加一个或直接添加列表。检索方式跟一维list类似。
1 2 3 4 5 6 G.add_node(1 ) G.add_nodes_from([2 ,3 ]) G.nodes[1 ] G[1 ] print(G.nodes()) print(G.nodes.data())
[1, 2, 3]
[(1, {}), (2, {}), (3, {})]
此时可以显示G包含的点的数目。
3清除G的内容。
类似的方式可生成单个边或一系列的边。检索方式跟二维list类似。
1 2 3 4 5 6 G.add_edge('a' ,'b' ) G.add_edges_from((['c' ,'d' ],['e' ,'f' ])) print(G.number_of_nodes()) print(G.number_of_edges()) G.edges['a' ,'b' ] G['a' ]['b' ]
6
3


{}文档中介绍,任意hasable的对象都可以作为点,常用的如:数字或字符。而边又可与任意object建立联系,G.add_edge(n1, n2, object=x)。
一个Graph也可以从另一个Graph继承过来点或边。
1
2
3
H = nx.path_graph(10 ) G.add_nodes_from(H) G.add_edges_from(H.edges)
2.向图形、节点和边添加属性
除去图、点和边之间的包含以及连接的关系外,各个个体还可包含有自身相关的信息,例如名称、颜色或重量等等的属性。 属性的结构为:键/值(key/value),键应当是hasable的,也就是说属性是一个字典结构。属性默认为空,但是可以通过add_edge,add_node 进行修改。对于图G来说,也可以直接操作属性字典:G.graph,G.nodes,G.edges,于修改字典的操作相同。
图的属性
1
2
3
4
5
G = nx.Graph(day="Friday" ) print(G.graph) print(G.graph['day' ]) G.graph['day' ]='Monday' print(G.graph)
{'day': 'Friday'}
Friday
{'day': 'Monday'}
点的属性
1 2 3 4 5 G.add_node(1 , time='5pm' ) G.add_nodes_from([3 ], time='2pm' ) print(G.nodes[1 ]) G.nodes[1 ]['room' ] = 714 G.nodes.data()
{'time': '5pm'}


NodeDataView({1: {'time': '5pm', 'room': 714}, 3: {'time': '2pm'}})
边的属性
特殊属性weight应该是数字,因为它被需要加权边缘的算法使用
1 2 3 4 5 G.add_edge(1 , 2 , weight=4.7 ) G.add_edges_from([(3 , 4 ), (4 , 5 )], color='red' ) G.add_edges_from([(1 , 2 , {'color' : 'blue' }), (2 , 3 , {'weight' : 8 })]) G[1 ][2 ]['weight' ] = 4.7 G.edges[3 , 4 ]['weight' ] = 4.2
3.访问相邻节点
1
2
3
4
5
FG = nx.Graph() FG.add_weighted_edges_from([(1 , 2 , 0.125 ), (1 , 3 , 0.75 ), (2 , 4 , 1.2 ), (3 , 4 , 0.375 )]) print(FG.adj.items()) print(list(FG.neighbors(1 ))) print(list(FG.adj[1 ]))
ItemsView(AdjacencyView({1: {2: {'weight': 0.125}, 3: {'weight': 0.75}}, 2: {1: {'weight': 0.125}, 4: {'weight': 1.2}}, 3: {1: {'weight': 0.75}, 4: {'weight': 0.375}}, 4: {2: {'weight': 1.2}, 3: {'weight': 0.375}}}))
[2, 3]
[2, 3]
4.绘图
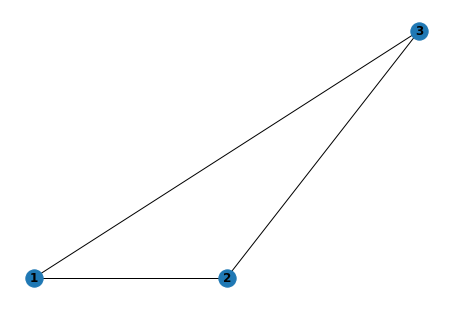
参考文档中给出了draw函数的详细参数draw(G, pos=None, ax=None, **kwds)。其中pos的介绍如下: * pos (dictionary, optional) – A dictionary with nodes as keys and positions as values. If not specified a spring layout positioning will be computed. See networkx.drawing.layout for functions that compute node positions. 也就是说pos是一个字典结构,节点的名称作为key,坐标list作为value。
1
2
3
4
5
HTG = nx.Graph() HTG.add_nodes_from([1 ,2 ,3 ]) HTG.add_edges_from(([1 ,2 ],[2 ,3 ],[3 ,1 ])) pos={1 :[0 ,1 ],2 :[1 ,1 ],3 :[2 ,2 ]} nx.draw(HTG,pos=pos, with_labels=True , font_weight='bold' )
png
5.有向图
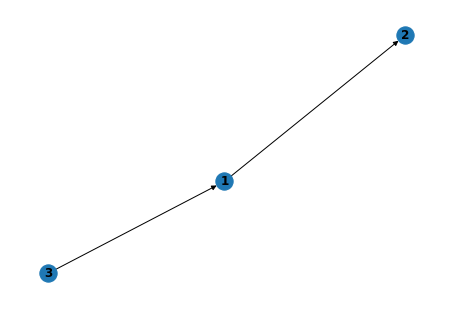
DiGraph 类为有方向的边提供了额外的属性,例如DiGraph.out_edges(),DiGraph.in_degree(),DiGraph.predecessors(),DiGraph.successors(),等等。为使算法在处理不同类上更加便利,有方向版本的neighbors等价于successors()。同时degree表示in_degree和out_degree之和。这种处理有时可能感觉不是特别一致。
1
2
3
4
5
6
7
DG = nx.DiGraph() DG.add_weighted_edges_from([(1 , 2 , 0.5 ), (3 , 1 , 0.75 )]) print(DG.out_degree(1 , weight='weight' )) print(DG.degree(1 , weight='weight' )) print(list(DG.successors(1 ))) print(list(DG.neighbors(1 ))) nx.draw(DG, with_labels=True , font_weight='bold' )
0.5
1.25
[2]
[2]
png
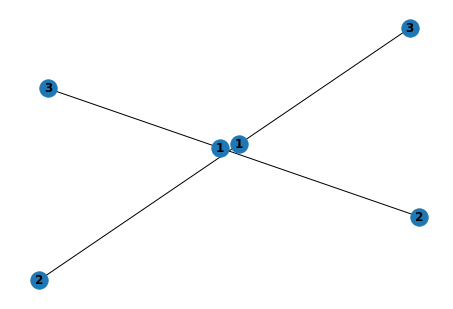
有向图可以转换为无向图。可利用Graph.to_undirected()或Graph()
1
2
3
4
H1 = nx.Graph.to_undirected(DG) nx.draw(H1, with_labels=True , font_weight='bold' ) H2 = nx.Graph(DG) nx.draw(H2, with_labels=True , font_weight='bold' )
png
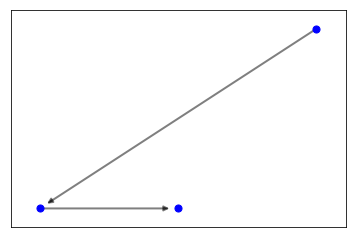
6.点与线分别设置样式
1
2
3
4
5
6
7
8
9
10
11
12
13
14
15
16
17
18
DG = nx.DiGraph() DG.add_weighted_edges_from([(1 , 2 , 0.5 ), (3 , 1 , 0.75 )]) options = { 'node_color' : 'blue' , 'node_size' : 50 , 'alpha' :1 , } nx.draw_networkx_nodes(DG,pos=pos,**options) options = { 'line_color' : 'grey' , 'linewidths' : 0 , 'width' : 2 , 'alpha' :0.5 , } nx.draw_networkx_edges(DG,pos=pos,**options)
[<matplotlib.patches.FancyArrowPatch at 0x25e4dbc6948>,
 <matplotlib.patches.FancyArrowPatch at 0x25e4dbca1c8>]
png
7.遍历边的属性
根据参考文档中networkx.Graph.edges的说明。该函数主要有一个data参数,当设置为True的时候返回(起点,终点,data字典),当为False的时候返回(起点,终点)。
1
2
3
4
5
6
7
8
9
10
DG = nx.DiGraph() DG.add_weighted_edges_from([(1 , 2 , 0.5 ), (3 , 1 , 0.75 )]) for u,v,d in DG.edges(data=True ): print(d['weight' ]) edges_list = [(u, v, d) for (u, v, d) in DG.edges(data=True )] print(edges_list) print(edges_list[0 ][2 ]['weight' ]) edges = list(DG.edges(data=True )) print(edges) print(edges[0 ][2 ]['weight' ])
0.5
0.75
[(1, 2, {'weight': 0.5}), (3, 1, {'weight': 0.75})]
0.5
[(1, 2, {'weight': 0.5}), (3, 1, {'weight': 0.75})]
0.5